|
|   |
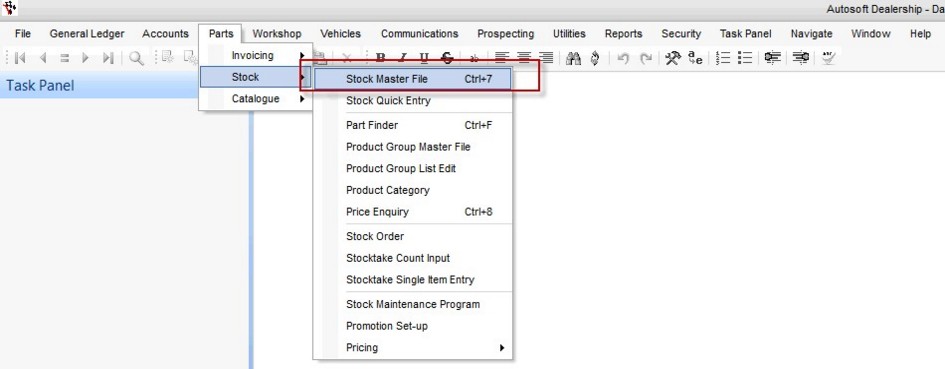
Stock Master File is where you can create, edit and look up information on parts. This where you can see detailed information on the stock you sell - including purchase and sell prices, quantities, re-ordering options, promotions, alternates, supplier item specifications and pictures of the stock itself.
Stock Master file is a frequently used program within Autosoft and has a shortcut linked to Ctrl+7.
Stock Master File Types
There are 3 Types of records - Stock, Pricing and Consumables
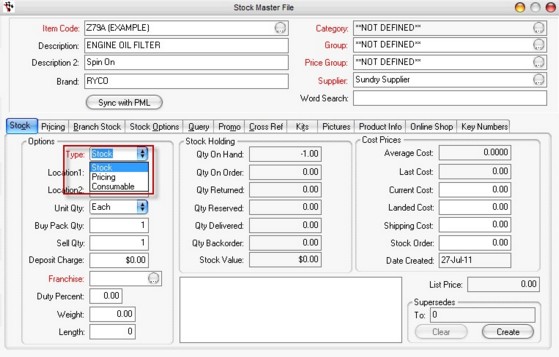
Stock - These are your normal Parts that you buy and sell.
Pricing - Parts that are on file for pricing purposes only. i.e. your suppliers parts prices and other relevant information can be loaded from disks and kept up to date with price update programs.
Consumables - These are workshop stock or supplies i.e. oil, grease, workshop supplies, environmental levy. Any stock or supplies that belong to the workshop. They have the same setup options and GL Mapping as stock lines but you can report on them separately.
The Stock Master File consists of the following:
Header Area
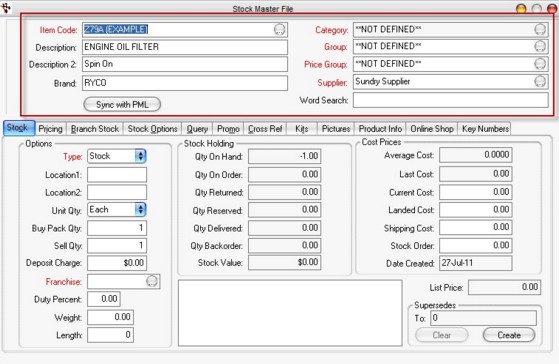
Item Code - Mandatory Field - Enter the part number of the item.
Note: To enter NEW stock press Tab to each field. You must select a Group, Matrix and Supplier for the new product.
Description - When adding stock keep in mind that searches can be carried out by description. i.e. Brake Pads can be entered as Pads Brake.
Description 2 - A secondary description field. The Transaction Finder and Item Search type Product Lookup - Detailed can both be sorted by this field as an example to assist in locating and differentiating stock.
Brand - Brand of the Stock
Category - Mandatory Field - The Category functions as item organization like the Group and Price Group. There are fewer reporting options clustered around category that Group, and there are not any pricing structures based around it like there are with Price Group. General Ledger account allocation can be set via category that will allocate funds of purchases/sales of a product in a particular category to accounts that differ from the General Ledger Control Account map - this is set in the Product Category option of the Stock menu.
Group - Mandatory Field - Groups are important. Reports and Stock orders are frequently printed by groups. Groups are setup in the Product Group Master File before entering new part numbers. Sales analysis and stock holding can also be reported in group format enabling stock ratios to be analyzed. Groups can be set as Stock-specific, Workshop job-groups or Fuel Groups. General Ledger account allocation can be set via Group that will allocate funds of purchases/sales of a product in a particular group to accounts that differ from the General Ledger Control Account map
Price Group (Matrix) - Mandatory Field - Select the Pricing Matrix that will determine how the item is priced when it comes to sales. Stock items in the same Price Group will have pricing affected in an identical way when setting discount and markup options for client sales. This is covered in more detail in the Customer Pricing Structure (Pricing Matrix).
Supplier - Mandatory Field - Select the supplier for this part. This searches the Creditor Master File for the supplier.
Word Search - Adds additional options for searching for a product using Transaction Finder (Ctrl + F).
Sync with PML ![]() - this will link into the Parts Portal on-line database and synchronize the current Stock Master File records with the Parts Portal Master List. Requires a subscription to actively update products. Product Descriptions, Groups, Categories and Brands will all be updated as per the on-line resource.
- this will link into the Parts Portal on-line database and synchronize the current Stock Master File records with the Parts Portal Master List. Requires a subscription to actively update products. Product Descriptions, Groups, Categories and Brands will all be updated as per the on-line resource.
Details Area
Stock Tab
Pricing, Stock-Type, quantities and locations are all listed on this tab. If marking up products for sale from their cost price, the base prices that are used are all found here. Allocation of stock is displayed here as well as options to have a stock item automatically revert to another item that has replaced it on any invoice, via super sessions.
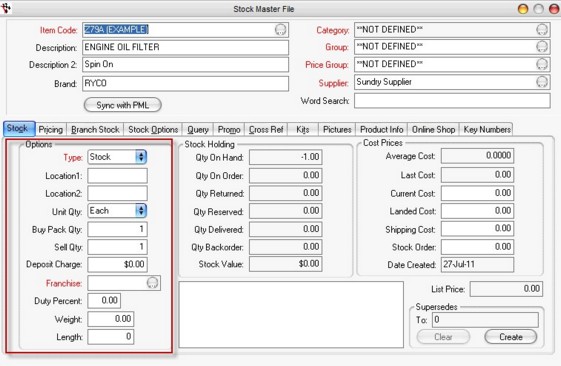
Options Column - item-specific options including:
Type - Stock types can be Stock, Pricing or Consumables (Workshop Stock).
Location 1 & 2 - The location of the part in your bins. There can be a second location setup for overstock or parts located in another area. If you do not have a bin location system it is advisable to set one up. Having a location system helps greatly in finding stock and carrying out stock takes.
There are many types of location layouts, one that is recommended is a 6-digit alpha/numerical location system
e.g. 01A05C = Row 1, Bay A, Shelf 5, Box or Bin C.
1st 2 fields are the ROW number.
3rd Field is the BAY letter.
4th and 5th Fields represent the SHELF position.
6th Field is the BOX or BIN location.
The BAY letters A,B,C,D,E, are numbered from LEFT to RIGHT while facing the ROW. Zeros (0) are used in the location so that the computer can logically sort locations for stock takes and reports. The computer prints 1A1 location in the same area as 10A10, this is why locations have to be in the correct format i.e. 1A1 = 01A01.
Unit Quantity - This can be Each, Metres, Litres, Other, Kit, Side and Pair. In the sales or purchase invoices you can sell or purchase in fractions to 1 decimal point. i.e. 1.5 metres.
Buy Pack & Sell Pack Qty - Parts can be purchased in bulk and sold as individual parts and vice versa. If a part has 10 in the Buy Pack Qty and 1 in Sell Pack Qty, when it is purchased 1 is entered, and stock on hand is increased by 10 and the cost is averaged by 10 when impacting on the average cost of the item. Alternatively, items may be bought singly and sold in larger packs - in this case if the Sell Pack Quantity is 4, entering 1 on a customer's Parts Invoice will amend the amount charged to be 4 times the List price for that particular item.
Sell Qty - Enter a quantity here and this will be the quantity shown on the invoice, default is 1.
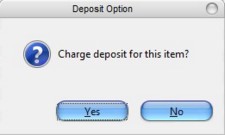
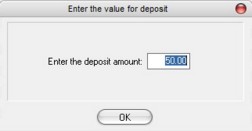
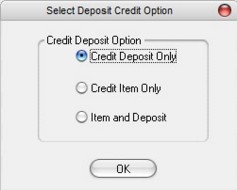
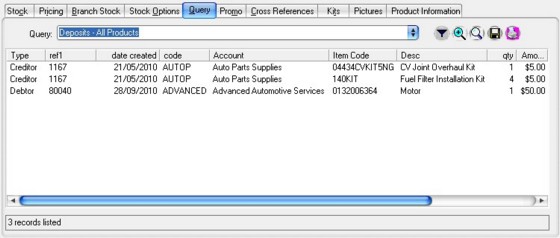
Deposit Charge (Core Deposits) - Enter a value for a core deposit charge, i.e. E1337 Brake Shoes $10.00. Core deposits are handled by the system for sales and purchases. When invoicing a part with a deposit, it will automatically show the core deposit amount. When invoicing a deposit the value can be changed to $0.00, the core deposit will still be tracked for that client.
Franchise - This is the franchise number of the part if you have more than one franchise. This is used for dealerships only and although it appears as a mandatory field, it will default to a franchise of No Franchise on non-dealership systems automatically.
Duty Percent - The percentage of duty for this item.
Weight - The item weight.
Length - The item weight.
Stock Holding column - A range of fields are shown for the quantity status of stock:
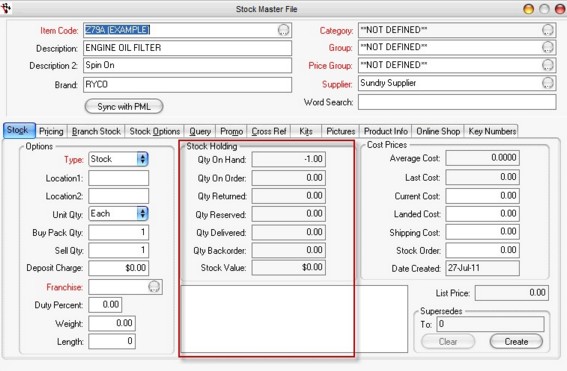
Qty On Hand - The quantity of current stock on hand.
Qty On Order - Stock on order to supplier(s).
Qty Returned - When a credit request has been processed.
Qty Reserved - Stock on a saved parts invoice or on a job card in the workshop - work in progress (WIP).
Qty Delivered - Quantity allocated from a creditor delivery docket waiting for the invoice to be processed, a saved creditor invoice.
Qty Backorder - Quantity of stock on backorder.
Stock Value - The current value of the stock item.
Notes Field - At the bottom right of the screen is a notes field. Comments can be written about this item. These comments can be viewed when in a Parts or Workshop invoice. They can also be transferred into the printed invoice if required by going to Stock Options tab > tick ![]() . The note will appear under the Item on an invoice and will automatically populate the Item Notes and Stock Comments fields on an invoice.
. The note will appear under the Item on an invoice and will automatically populate the Item Notes and Stock Comments fields on an invoice.
Cost Prices column - A variety of costs that relate to a product are held here;

Average Cost - The unit cost of stock. Initially this can be established by calculating the Stock Value � Quantity on Hand. This field cannot be edited.
Last Cost - The last purchase cost on a Creditor Invoice will be reflected here. This field cannot be edited.
Current Cost - The last purchase cost can be entered here manually, it can also be updated automatically from a creditors invoice by ticking Automatically Update Current Cost Field in Stock File from the Options box in the creditors invoice.
Landed Cost - The landed cost.
Shipping Cost - The cost for shipping.
Note: All costs are exclusive of GST.
Stock Order - This is the cost that can be selected when performing a stock order for the selected product
Date Created - The date the part was originally added to the stock file.
Supersedes - This is used when a part has been discontinued and replaced by another.
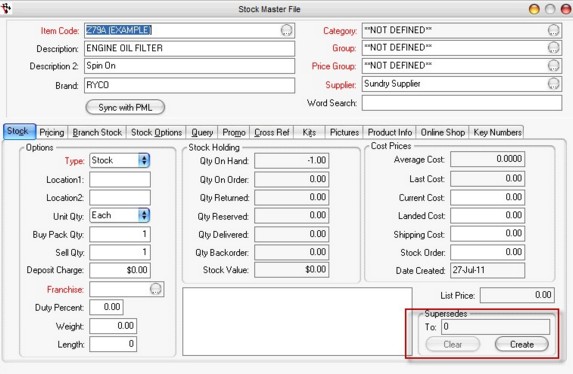
Create - To create a supersession both parts must be in the stock file. Choose the part that is going to be superseded, click on Create Supersession button and find the item that you are superseding to in the available selections list. The new item will show in the supersession box and the stock quantity will be transferred to the new item. Additionally when entering the newly superseded item on to an creditor/parts invoice, you will receive a message Item x has superseded to y, and the item code will automatically change.
Clear - Click this button to remove an existing supersession, allowing sales of that product to resume
Pricing Tab
This is where all the sell pricing is setup for your Parts. This can be as simple or complex as you need it to be. If you have only 1 Price for all customers, enter this price in List Price. If you have different types of customers,

List Price - This is the standard Retail Price that is charged. It is also the base price from which all Discount Pricing structures are set against. This is a field that can be manually edited, or changed on a creditor invoice if the correct option is selected (Allow Stock Selling Price Changes - When this box is ticked the Sell Price field in the Item Details Tab goes from grey to white. When white, Selling Prices can be changed. These changes will be reflected in the stock master file, in the List Price field as well as the List Price field on the Creditor Invoice itself.
Price2, Price3, Price4, Price5, Price6, Price7- All of these can act as the base price for Discount Pricing structures if nominated in the customer pricing structure setup.
Last Price change - Displays the date of the last price change.
Branch Stock Tab
The Branch Stock displays the stock levels for the selected product and the cost details across multiple branches (if you are utilizing Branches functionality in your Autosoft Software)

Stock Options Tab
The Stock Options tab contains reorder details for the item, Stock updates utility and backorder maintenance, item options and Dymo parts label printing.

Re-Order Options - Setting values here and essentially make determinations on ordering for you. Values in Weeks Cover and Max/Min are referred to when doing an Auto-Create on a Stock Order for example. This is a powerful tool that increases in accuracy over time, and these re-order options have the potential to manage your inventory ordering requirements entirely.
Don't Reorder - Tick this box if you don't want this item available in the Stock Order View program to be ordered.
Weeks Cover - Calculates stock re-order from the amount of weeks entered.
Maximum and Minimum - Enter the maximum and minimum levels for the item.
If you only want to use Minimum and Maximum, leave Weeks Cover blank and enter quantities into Minimum and Maximum. When the stock falls below the minimum, the system will order up to the Maximum. Minimum and Maximum figures can also be used with Weeks Cover (they will be ignored if left blank). i.e. If you set the Minimum at 10 and the Maximum at 100 and weeks cover suggests to order 120, only 100 (the maximum) will be ordered.
NOTE: Also in regards to Weeks Cover and how they work with Max / Min: Weeks Cover is dynamic and gives you an ordering point based on your stock history which changes over time as your history on a stock item increases. The longer you have used the system and ordered a particular part, the more accurate it becomes as it averages out the sales and orders over a longer period to work out its values. This can work in conjunction with the Max / Min by setting boundaries to the ordering.
Max / Min is a static amount that is set by yourself and will overwrite weeks cover in some cases, eg if stock still has an amount that equals its Max then the weeks cover will be ignored and no stock ordered. Max / Min basically provides a means of regulating the stock ordered when hitting auto-crate on a stock order.
Sell Category - There are options for further Stock reporting with Sell Category. On the Stock Value report, there is a sell category column visible to add further classification to products.
Warehouse Supplier - When running Stock Orders utilizing the Auto Create function, you can select items that only come from Warehouse sources. Ticking this will allow separate stock-orders to be created
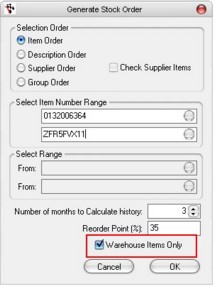
Options from selecting Stock Auto-Create in a Stock Order
Stock Updates
We advise that you please call Autosoft if you want to run the stock update utility. This will make irreversible changes to your stock portfolio, and therefore should only be undertaken with a current backup on hand.
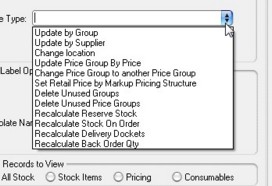
There are a number of utilities:
Buttons
Run ![]() - Runs the selected stock update type.
- Runs the selected stock update type.
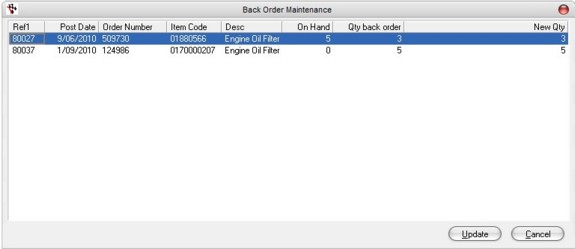
Backorder Maintenance ![]() - Click this button to update, modify and delete backorders in the system.
- Click this button to update, modify and delete backorders in the system.
Click on the New Qty field and enter in the new quantity, then click on the update button to implement any changes.
Typing 0 in the New Qty field will delete the backorder from the system and essentially perform the same function as hitting the Mark Received button in the Stock Order program itself.
Tick Boxes - small tick-boxes that can make big changes to the way stock is handled by the system.

Buy In - This box is automatically ticked when selling or receiving a non stocked part i.e. parts created while processing a Creditor, Parts or Workshop invoice will be entered into the Stock master File as Buy In, this means the Buy In box will be ticked. Analysis can then be carried out of your buy in stock from monthly reports. Parts required can be made stock lines by unticking the box, parts not required can be deleted.
Inactive - If you no longer want a part to be able to be used on invoices, tick the Inactive box. There is a query that will show inactive products, and the product will not show on certain reports - for example the Stocktake reports.
Dismantled (Second hand item) - Tick this box if the item is a dismantled item. See Dismantling section for more information on these product types.
GST Free - Tick this box if you do not charge GST for this item.
Always Print Note on Invoice - Item notes typed in the Stock Tab are always printed on the invoice, under the Notes tab 'Item notes' and 'Stock Comments' if you tick this option. Editing the Stock Comments on an invoice will update the notes field in the Stock Master File as well.
Don't Update Qty - These are items that you do not want to include as stock but keep sales information on them. i.e. promotional items, generic part numbers or a part number for a labour charge. These lines do not have stock on hand values, and cannot be 'purchased' the conventional way (ie Creditor invoice stock entry). If you purchase non-stock items they are usually allocated to an expense account via the GL Tab of the Creditor Invoice.
Reconditioned - Only items with this box ticked will appear in the Reconditioning Invoice under the 'Reconditioned Item' field. This denotes an item that has been reconditioned and added into stock to be sold.
Don't Export for Web - When there is a Link between Autosoft to a website, this option can be ticked to exclude the information for the selected product to be excluded from any web listing.
Don't print a Label - Works in tandem with the Print Parts Labels for this Invoice option on the Creditor Invoice. This will prevent the part having the label printed even if the creditor invoice option is ticked. Allows for invoices where some parts labels need printing and others don't.
Track Serial Number - An option has been added to the Parts Stock Master File that allows users to identify the parts for which they want to be able to track serial numbers against. When a part has this option ticked, it will prompt the user with a dialogue box to enter a serial number whenever that part is used on an invoice. Once the serial number has been entered, a message will appear on the invoice screen when that item line is highlighted advising the user of the serial number associated with that part![]() . Assigning a serial number means that the item can only be sold as a single, as a serial number cannot apply to multiple products. See Serial Number Finder for further information on how this functionality operates.
. Assigning a serial number means that the item can only be sold as a single, as a serial number cannot apply to multiple products. See Serial Number Finder for further information on how this functionality operates.
Dymo Label Options
Open Label - Opens the Dymo Label Software program with the chosen template.
Print - Prints the parts label to the Dymo printer.
Template Name - Choose the parts template by clicking on the ellipsis and selecting the template.
Select Records to View
![]()
As mentioned before, this filters the Stock Master file searches to show products of a certain type only
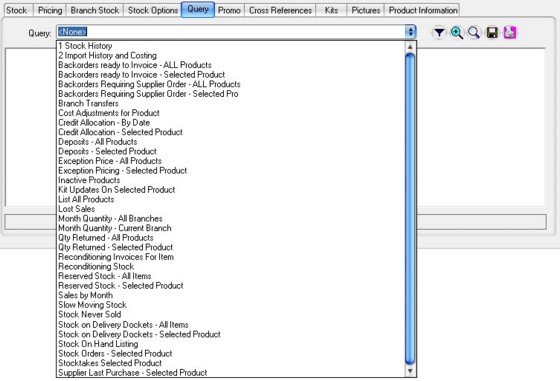
Queries Tab
There are various queries you can run - drop down the list to see the options
Promotions Tab
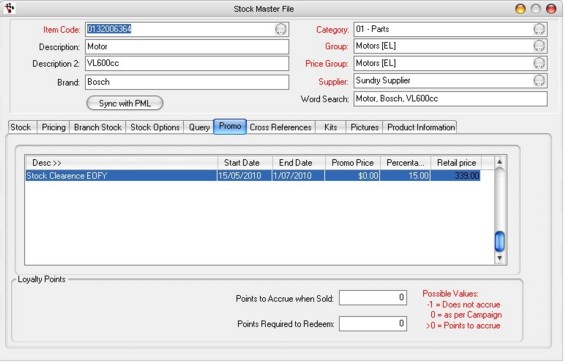
Promotions are added in the Promotion Master File. This tab displays tells you the promotion name, dates of promotion and prices.
Cross Reference Tab
Alternates Sub-Tab
Parts can have alternate numbers that can be used instead of the original. Alternate parts must be in the stock file before the can become alternates. To add an alternate part choose a part number by clicking on Item Code >> and entering in the item number. If a part has an alternate the Alternate box in the invoice will become highlighted click this box to show alternate parts.
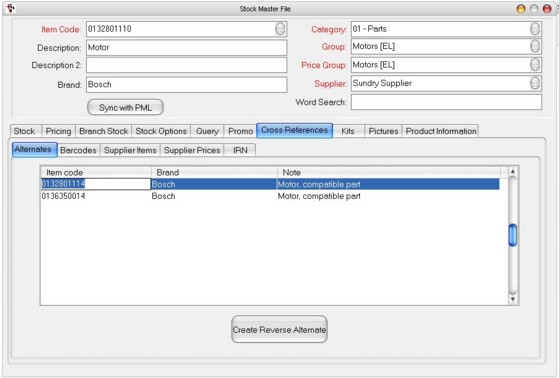
Reverse Alternate number - created by clicking in the item code column and select an alternate number.
Create Reverse Alternate button- create the reverse alternate by highlighting an existing alternate number and clicking on this button
Both the Item Number and the Alternate Number will now show an alternate number in the price enquiry screen or invoice.
Barcodes Sub-Tab
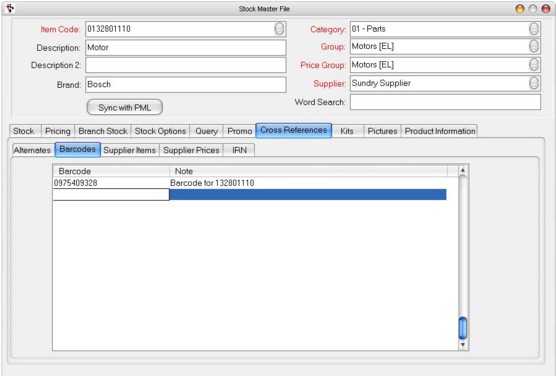
Barcode numbers are stored in this tab. You can also have a range of other numbers for this Part Number, i.e. genuine number, other non-genuine numbers, price lookup number (PLU) etc. If a part number in the Barcodes tab was entered into an invoice it will automatically find the part in Item Number.
Supplier Item Sub-Tab
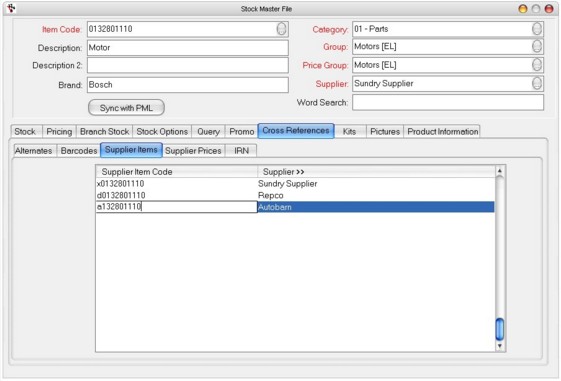
If a Supplier Item is added this number will show on the stock order instead of the Item Number for the listed supplier. The Supplier code must be entered into the Note field.
Part numbers cannot be repeated in any other barcode tab, all numbers must be unique.
IRN Sub-Tab
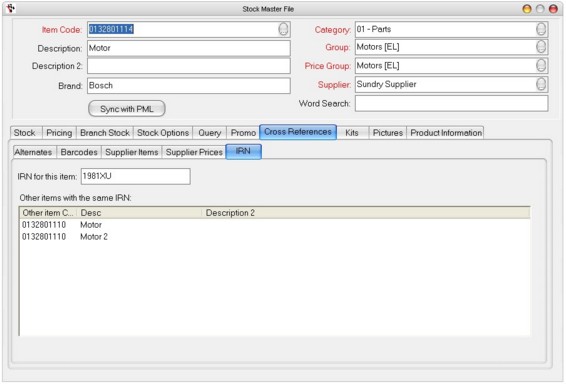
Industry Reference Numbers are assigned to parts from different manufacturers that are essentially identical. There are numerous IRN's that have been setup for use with the Parts Master List (PML) effectively providing a library of cross referencing across different manufacturers for substitute parts.
Internal Reference Numbers can be administered to stock items in this tab as well for businesses not utilizing the PML. Other items sharing that same IRN will be listed beneath the reference number itself. An example of where this can be used is if there are numerous entries of the one part number in the Stock Master file, each stock item can be given a unique IRN to classify it differently to the other stock items sharing that Item Code.
Kits Tab
You can make up a kit by adding existing part numbers that form the kit into the designated region of this tab. That Kit will act as a unique part that can be sold, and the parts that form the kit will automatically be added to any invoice in which this kit is used.
Click in the item code column and press F4 to bring up a parts list. Select the items that make up the kit.

Print Kit Pick Slip - Click this button to print out a pick slip for the kit.
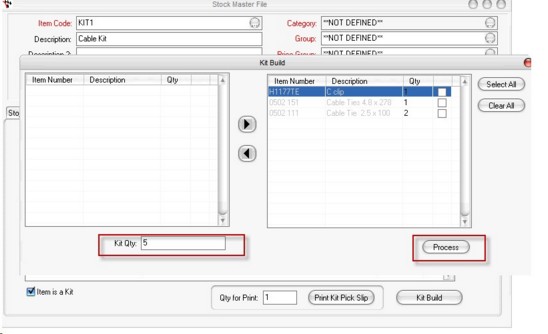
Kit Build - Once all items are added to make up the kit, click on the Kit Build button. Tick the items on the left hand side and click on the right arrow in the middle. This will transfer the items selected to be in the kit. You can also select all items quickly by clicking on the Select All button.

Arrows - Tick the box next to the kit part to add it to this kit build, then use the arrow to move it to the right selected column.
Select All- Use this button to select all the parts you want to be built in this kit.
Clear All - removes all items selected for the kit.
Kit Qty - Once all items are selected to be in the kit, type in how many kits you intend to create, in the Kit Qty field located at the bottom of the screen. This will subtract the stock on hand for each item selected for the kit.
Process - Click on the Process button to create the kit.
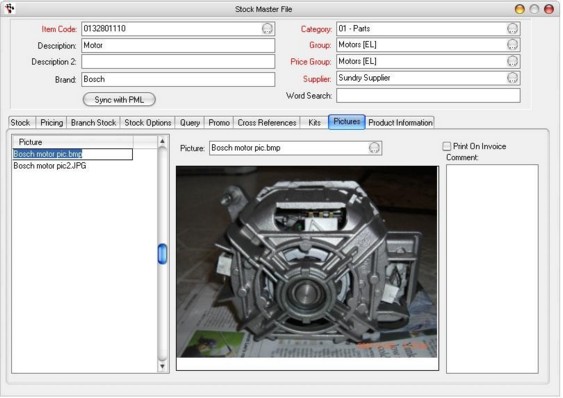
Pictures Tab
The pictures tab displays images of the item. Tick on Print On Invoice tick-box to automatically print the image on the invoice.
Product Information Tab
Any other information about the product can be listed here.
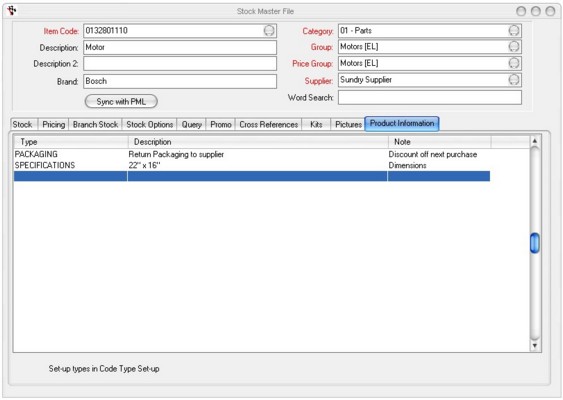
The Type must be pre-set in the Codes Type Setup (Go to Utilities >> System Set-up >> Code Type Setup and select Product Information from the drop-down list)

Key Numbers Tab
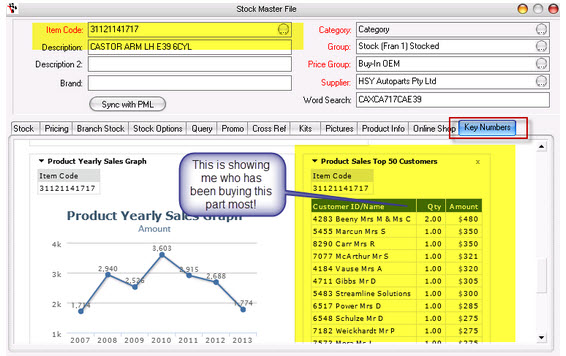
Top 50 Customers a Selected Part was sold to - You can now select a part and see the top 50 customers which bought the part at the click of a button. Previously you also would have had to run a report, filter then export it to see this info
|
What are you trying to do? |
Video/Knowledge base Guide |
|
Add New Parts |
http://service.autosoft.com.au/entries/22859289-How-to-add-in-Parts-and-your-options- |
|
Create and Manage Parts that come in Litres, Meters and Packs |
|
|
Stocktake |
|
|
Use Cross referencing for extra supplier or other codes and barcodes |
|
|
Delete or make part inactive |
http://service.autosoft.com.au/entries/21550505-How-to-Delete-or-Make-a-Part-Inactive |
|
Watch videos to learn more |
Go to your Client Portal Login - Training Lessons - Parts Series OR Quick Start Training - Parts Basics |